Tuesday, 29 May 2012

More Lil Primrose girls

If you liked the Lil Primrose girls from Kaiser that we featured in the last post then we have some more cards featuring the girls.
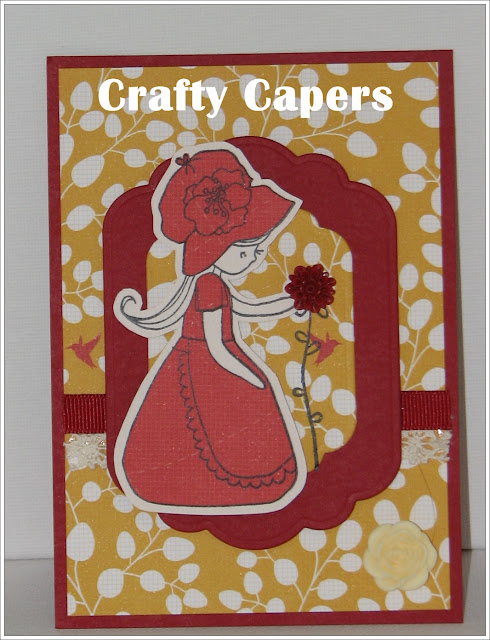
This card has been coloured in with Tombow pens. The blender pen was used to put on a wash of colour for a softer look.
For this card we stamped her straight onto Sculptured card (metallic ivory card) and then stamped her hat and clothing onto printed paper, cut them out and pieced her together.
We also used printed paper on this card to decorate the little girl. She had been stamped onto Buttercream  Prismatics which is a great colour to work with as it is a cream coloured card that does not have tones of yellow in it. As it is from the Prismatics range it has an indented texture and is great for stamping and colouring .

Sunday, 27 May 2012

Lil Primrose

In March we used the gorgeous Lil Primrose girls from Kaiser to create these 3 lovely cards.  
These cards featured in our classes and we had lots of fun teaching our customers how to recreate them. 


In the card above we stamped the little girl on Buttercream Bazzill and onto the green print. We trimmed around her body leaving a small border and them trimmed around her hat and dress cutting along the line. The dress and hat was then glued onto her body. Any small print can be used for this technique. It is a great way to put colour into a stamped image without having to colour it. She was then mounted onto the die cut circles which were adhered to the printed paper and then the card base. Rub ons and ribbon were also used to embellish the card.


The card above is done in the same way as the first card. Another small print was used for her dress and hat. If you have 6" paper pads at home go through them and you will find that you have a great collection of paper that has a variety of small prints on them. Kaiser, Doodlebug and American Craft papers often have great prints that you can use for this technique on the back of their main prints. The image was then mounted onto the die cuts which were mounted onto the printed paper and then the card base.
The card above has been stamped with Staz On and coloured in with Tombow pens. A "water colour" look was created here by picking up colour with the clear blender pen and colouring in. No shadows were included as we wanted a soft look.

Did you know that raising the layers on your card with Magic Mount (double sided sticky foam) will make even the most basic layout look more complex than what it is. In the card above we have mounted the girl onto the top die cut. This layer is then mounted onto the larger die cut. Sometimes we also double mount a layer if we want to make a feature of it on a card.

 Magic Mount comes in 2 colours (black and white). White is used a lot of the time but black is very handy when you are working on dark cards (as white stands out against dark cards). 
Why not try using some on the next card you make.

All items used above are available at you know where -
Crafty Capers!!!!!

Friday, 25 May 2012

Our Very Clever Customers!!!!!


Our very clever customers have been very busy again.

Estelle made 3 cards and brought them in to show us. The first two cards were made using the great new Tim Holtz Embossing Folders from Sizzix . These two folders (Diamond Plate + Riveted Metal) are great for men's cards as they have the industrial look about them. 


Diamond Plate & Riveted Metal Set by Tim Holtz
She also made this card using the new Autumn Tree stamp from Stamp It. I love the way she has decorated it with Flower Soft.

Autumn Tree

Shirley has also been busy making cards. She made this amazing creation for her grandson who is turning 5. She did a great job on putting all of the elements together. I am sure that Liam will LOVE his card.

 I loved the way she stamped the flowers in a coloured ink on the cards below and coloured them in using the matching Liquid Pearls and Gelly Roller Gel Pens. Shirley often cuts around her stamped wording which looks unique. This technique can be a bit fiddly but always looks great.


The Embossing Folders, Liquid Peals, Gelly Roller Pens and Autumn Tree stamps are all available for purchase at Crafty Capers.

Wednesday, 23 May 2012

Bonjour sneak peek

Here is a sneak peek of a display that will be going up on Friday. 
We used the Kaiser Bonjour paper pad and great new stamps from Stamp It to create the display of 10 cards.


Make sure your drop by to have a look.

Tuesday, 22 May 2012

More Spectrum Noir Demos

This week we will be having more Spectrum Noir Demonstrations.
                                              Wednesday 23rd May
                                                                  9.30 - 12.00
                                               Saturday 26th May
                                                                 9.30 - 12.30
To get more information on the demos click on the tab above.
Here are some more images that have been coloured in using the Spectrum Noir Alcohol Based markers.


Monday, 21 May 2012

Quick and Easy cards

Here are a couple of easy layout for you to whip up and put aside for when you need a card in a hurry.
Labels Two

The card above is what we call a DL card because it fits in a DL sized envelope. The card base is 21cm x 21cm and when folded the base is 10.5cm x 21cm. We have used 2 lovely prints from American Craft, a strip of gross-grain across the centre to hide the join, 2 sparkly brads at the top and a white rub on a Spellbinder Labels #2 die cut. We have used the same coloured card for both layers of the die cut for a different look. We are hoping to get the "Happy Birthday" rub ons back in stock soon. We will let you know as soon as they come in.
Squares
The card base for this card is 4.5" x 9.0" or 11cm x 22cm. We have used 3 of the American Craft prints on this card along with a black rub on, thin satin ribbon and Sizzix Square Framelit dies. The Framelits were used to make a square frame which is mounted onto the card base (the pink print). 
All materials used to make these cards are available at Crafty Capers.

Tuesday, 15 May 2012

Liquid Pearls

The 15 new colours of Liquid Pearls are flying out the door. 
We will be topping up on the new colours as well as the original 15 colours this week. 
Here are a few samples of images we have coloured in using Liquid Pearls and Adirondack Dimensional Pearls. The Dimensional Pearls are the same as Liquid Pearls but the colours match up with the Adirondack Ink Pads. 
All images have been coloured in using both products. To colour with the product, put a small amount on a plate, dip your brush into water, squeeze out the excess water and begin painting. They give a great finish when you colour on textured card.


Baby BlueLavender LaceMint GreenPetal PinkRuby RedSilver PearlWhite OpalPlatinumBisqueButtercupCantaloupeFlamingoOcean BlueRougePeacock
These are the original Liquid Pearl colours

Sunday, 13 May 2012

Happy Mother's Day

Happy Mother's Day to all of my lovely customers.

As you can see we are still making more of the wonderful spring boxes. I made up this box to give to my Mum on Mother's Day . The flowers were stuck to the acetate/clear film using Glossy Accents. Diamond Glaze, Glass Finish + Dimensional Magic can also be used for this. First I put a blob of Glossy Accents on the back of each flower and let it dry. Then put another blob onto of the first blob and lay the thin strip of acetate in place. I wanted this box to appear like a bouquet of flowers which is why it has so many in it as well as a lot of ribbon. It can fold down and go into an envelope but I gave it to Mum in a box.


As most of our boxes have been flowery and pretty, Jill decided to make one for the boys. She adhered the sticker of a sailing boat to a piece of acetate/clear film and trimmed around the edges of it and attached it to the piece of cover board that sits inside the box.


Here is another box that Jill made for her sister. She used similar colours that we had used on our original class sample. She finished it off by using cream pearls in the centres of all of the flowers. 

She also made a matching card . The box was folded down and put inside the card which made it much easier to slip into the envelope.  
The next two boxes have been made by our customers. Jacqui made this gorgeous black, white and silver box using the Doodlebug printed paper and matching glittered stickers. The stickers are adhered to strips of acetate/clear film. To stop the backs of the stickers sticking to the box when it is closed, put bicarb soda or talcum powder on the backs of the stickers. It will stick to the areas that are sticky. Jacqui used silver ribbon  in the centre of the box and this made it look very elegant.

Gail also used the Doodlebug paper that we have in the shop at the moment and included layers silver, red and Bazzill Bling (metallic) black. Black, white and red always look stunning together especially when teamed up with metallic colours. Gail used red and silver rhinestones in the centres of the flowers and she finished her box off with a lovely little bow at the front .

What clever customers I have!!!!!!