Wednesday 21 November 2012

More cards from Shirley


Here are some more cards that Shirley has made.

The blue, white and silver together looks fantastic.

Thanks again for sharing Shirley.


Tuesday 20 November 2012

Shirley's cards


Shirley has been busy making up her Christmas cards. 

We have a collection of her cards to show you over the next few days.

The cards below have been created using Stamp It stamps and printed paper from Allison Ellis. 

A simple design always looks amazing when you get your colours right.

Thanks for sharing Shirley, these cards look great.


Monday 19 November 2012

A few more Christmas cards.

Here are two more cards that are up on our Christmas display.

Make sure you pop in for a look at all of our Christmas cards that we have up.

The cards look great on the blog but they look so much better when you see them in person.


Saturday 17 November 2012

Mary's Christmas cards


Mary attended our classes in October and then went home and made up her own variations of the cards using Kaiser Christmas paper and stamps from 2011 and 2010.

Great job Mary.
Thanks for sharing.


Friday 16 November 2012

Folded Circle Christmas Tree Card

Can you believe that this tree is made from half a circle!!

What a great way to use up all of your Xmas paper scraps.

One of our customers found the link to the pattern and showed us.
Thanks Astrid for sharing this great idea.

Gaie saw our card and went home and tried making the tree by cutting out the circle with the largest Scalloped Circle Spellbinders die and she said it also looks fantastic. Thanks for that great tip Gaie.


Click on the link above to see the original tree card and then on the link below to get the pattern for the circle.

Happy folding!!!!!


Thursday 15 November 2012

More embossing folders


Here are some more cards that Jill and Sharyn have made using the Couture Creations Embossing Folders. 

The first folder is called Giving and it is the folder that we will be using in our next class. it is a great folder as it can be used for all types of cards including Christmas, Birthday and Weddings.


The second folder is called Merry Christmas and features a Christmas tree, decorations, birds and wording.


These folders will fit through all brands of Die Cutting machines.

Wednesday 14 November 2012

Monday 12 November 2012

Mint Twist


Sharyn (our talented designer) whipped these cards up a few weeks ago.

She used the Mint Twist paper pad, collectables and rub ons from Kaiser to create this bright collection.


All items used on these cards are currently in stock at Crafty Capers


Saturday 10 November 2012

Christmas boots

I love these little Christmas boots.

The brads come in 3 colours (red, blue and green) and are only 25c each.


Friday 9 November 2012

Koala christmas

You don't always have to have a Christmas stamp to make a Christmas card.

The Tree Koala stamp from Stamp It is a wonderful stamp to use and would be perfect on your cards that you send away overseas.

Tree Koala


Here we have stamped the koala onto Bazzill card and coloured him in with Liquid Pearls. We have also used circle dies to make a bauble and Christmas rub ons to finish decorating the card.


The koala below has been coloured in with Spectrum Noir pens. We used the circle dies again to make a bauble. We turned our bauble into a hanging decoration but you could adhere it to a card or scrapbooking page.


All items used on these cards are available at Crafty Capers.

Thursday 8 November 2012

Festive Foliage

Jill was playing around with the Tim Holtz Festive Foliage pack. The pack contains 10 metal flowers, 5 metal leaves and 5 fasteners. 

Festive Foliage

These flowers below have been decorated with a red rhinestone in the centre.

To get the red in the centre of these flowers Jill coloured the fastener (brad) with a red Spectrum Pen.


The packs of foliage are only $10.75 per pack. 
The packs of foliage, stamps and paper used on these cards are all in stock now at Crafty Capers.

Tuesday 6 November 2012

Christmas Embossing Folders


We have been playing around with the embossing folders from Couture Creations. 

These lovely designs are simple to use and look fantastic.

The folders are made for Australian sized card bases and fit perfectly on a standard size card base (A5 folded in half).

Here are the 4 designs that we got in last week.


Here is what Sharyn and Jill created with the folders.


Here is what some of our customers created with their new embossing folders.


These 2 folders arrived today. I will let you know what we have created in the next few days.


All folders are currently in stock and are only $9 each and will fit through both the Sizzix Big Shots and Cuttlebug machines.

Make sure you pop in and get yours before they disappear.


Monday 5 November 2012

Tri Fold card instructions


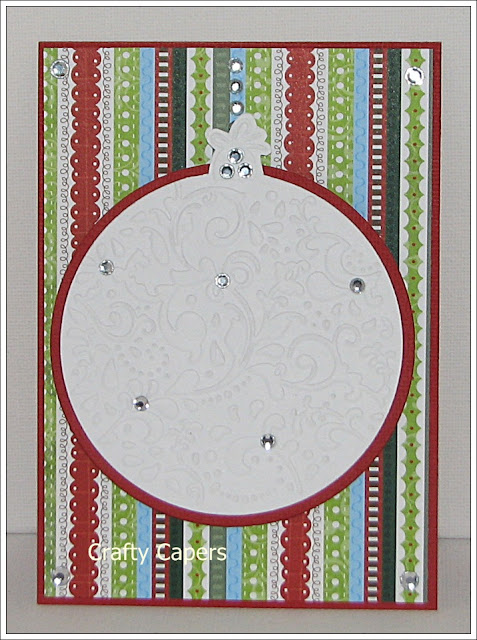
These two cards are on display in the shop and have been very popular. 
To save me explaining it over and over again we have put the instructions below. 
Please be aware that the instructions are in inches as the card and paper we use are 12" and it is more economical to work this way.


Bauble Trifold
(with apologies from Jill for the 16ths of an inch)
Requirements
American Craft Pomegranate                                      A5 (card base)
American Craft Pomegranate                                       2 ½” x 1 ¾”
American Craft Pomegranate                                       2 ¼” x 3.0”
American Craft Straw                                                  2 ¼” x 5 5/8
Foil Board Gold                                                           3 ¼” x 1 ¾”
Kaiser Turtle Dove -Paper Pad flower print   5 5/8” high x 5 ¾” wide
Kaiser Turtle Dove - To Froms PS229                     3 tags as shown
Kaiser Turtle Dove - stamps                                       
Kaiser Rhinestone Strips – Antique Gold
Stamp It Unmounted Stamp – Heartfelt Wishes 4721D
Brilliance Pigment Ink Pad – Galaxy Gold
Embossing Powder - Gold
Gold Ribbon                                13 ½” (cut into three 4 ½” pieces)

Instructions
1. Score and fold your card base in half.
2. Working on the non-textured side of the card base, draw pencil marks on the top edge 1 ¾” to the left of the fold line and 1 ¾” to the right of the fold line. Do the same on the bottom edge.
3. Score and fold between corresponding marks. Do not sharpen folds yet.
4. Trim off a 5/8” wide strip from the LEFT-hand side of the card base.
5. On the first and third fold lines, draw pencil marks 1 15/16” (or 4.9cm) down from the top edge and up from the bottom edge of the card.
6. Use a scalpel or craft knife to cut between the two top marks, and between the two bottom marks.
7. On just the middle strip of the card, sharpen folds to become mountain, valley, flat (don’t sharpen). Sharpen top and bottom strips to be flat (don’t sharpen), mountain, valley. Erase all pencil marks.
8. On the flower print draw pencil marks at 2 ¼” and 4 1/16from the right-hand end. Score and fold between corresponding marks. Erase pencil marks.
9.  Use small pieces of double-sided tape to temporarily adhere the flower print to the right-hand edge of the card base. Turn card base over and re-cut along the cut lines, cutting through the print behind. Remove the print from card base. On the three flaps you have on the left side of the print, cut off 1/16” from above and below the two middle cut lines, cutting away narrow strips at fold line.
10. Also shorten top and bottom flaps by cutting 1/16” to the right of the first fold line.
11. Adhere flower print into card base.
12. Trim the edges of the three perforated tags to just remove jagged edges.
13. Adhere tags to foil board layers. (Adhere a flower print off-cut from step 10 behind centre tag – trimmed to fit).
14. On a piercing mat, push scissor blades through tag hole and foil board to make a slit for ribbon. Feed ribbon up through slits and loop.
15. Adhere foil layer to card front.
16. Stamp and emboss in gold the wording onto Pomegranate card. Trim and adhere into card.
17. Stamp and emboss in gold the three baubles onto Pomegranate card. Trim and adhere into card.
18. Adhere rhinestone strips. Adhere Straw writing panel behind card.
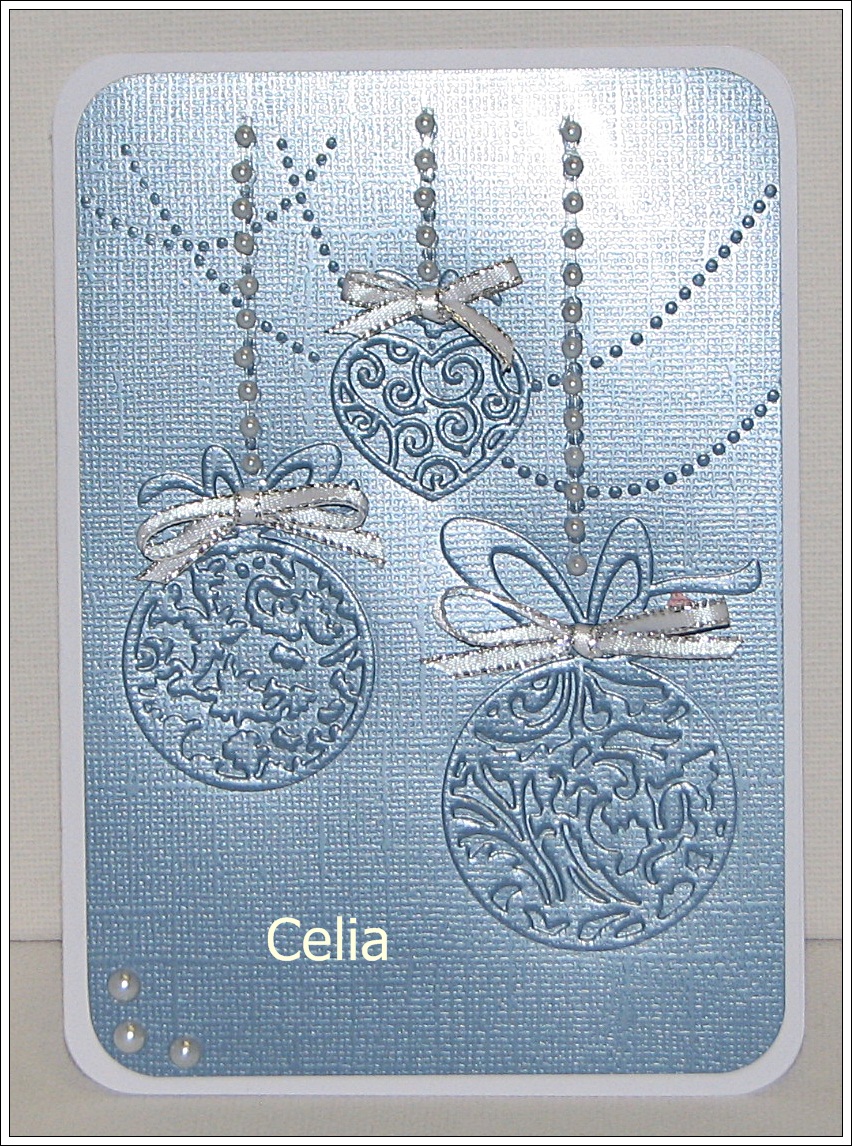


Music Tri Fold
1. Card base is Ladybug bubbles card and is A5.
2. Score and fold your card base in half, textured side in. 
3. Working on the non-textured side of the card base, draw pencil marks on the top edge 1 ¾" to the left of the fold line and 1 ¾" to the right of the fold line. 
4. Do the same on the bottom edge. Score and fold between corresponding marks. Do not sharpen folds yet. 
5. Trim off a 5/8" wide strip from the LEFT-hand side of the card base.
6. On the first and third fold lines, draw pencil marks 1 3/8" down from the top edge and up from the bottom edge of the card. 
7. Use a scalpel or craft knife to cut between the two top marks, and between the two bottom marks. 
8. On just the middle strip of the card, sharpen folds to become flat (don't sharpen), mountain, valley. 
9. Sharpen top and bottom strips to be mountain, valley, flat. Erase all pencil marks. 
10. Adhere music print (1 3/4" x 5 3/4") to left-hand side of card front. 
11. Adhere music print (2 1/4" x 5 3/4") to right-hand side of card.
12. Adhere two girls to Ladybug (3 1/8" x 2 1/8") and trim to leave very narrow border. 
13. Adhere girls with Santa to Ladybug (3 1/8" x 2 1/8") and trim to leave very narrow border.
14. Adhere girls and Santa panels to gold foil board (2 pieces 3 1/4" x 2 1/4). 
15. Mount Santa panel onto music with mount only behind right-hand edge. 
16. Mount girls panel beside music. Stamp and emboss "May all the joys ..." in gold onto Ladybug (1 3/8" x 3.0") and adhere to centre strip left of Santa panel. 
17. Adhere red rhinestone strip.

All items used on these cards are available at Crafty Capers.